Welcome to the first ever T+B Home and Garden Post! I figured what better way to kick off this series than to post our recent bathroom remodel before and after.
This remodel a lot longer of a timeline than we intended. The finished product, however, is so amazing and couldn’t have turned out any better!
And to warn you, I apologize in advance for the excessive amount of photos you are about to see…
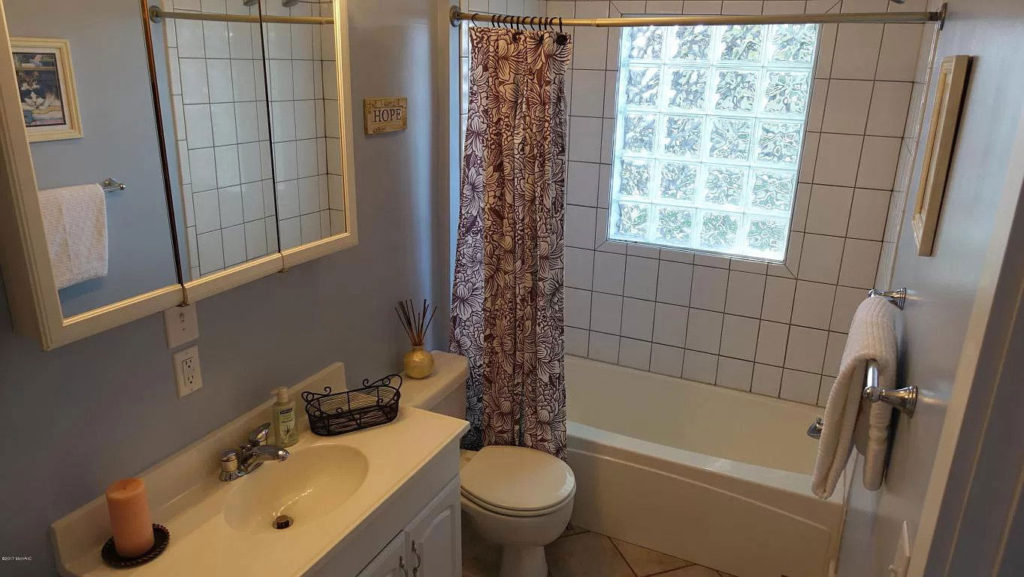
This first before and after shot is one of my favorites. I wish I had known I would be blogging about this kind of stuff when we first bought the house because I would have taken way more before photos. Instead, I only have two before photos. Both from really strange angles. I did try to replicate the angles in my photos so that you truly can see the before and after’s.
I will say I am so excited with how this bathroom turned out. At first, I doubted myself. And all of the pieces coming together in the end for a bold beautiful look. I am now so truly excited for how everything came together.
Starting with the tile floors…

Before 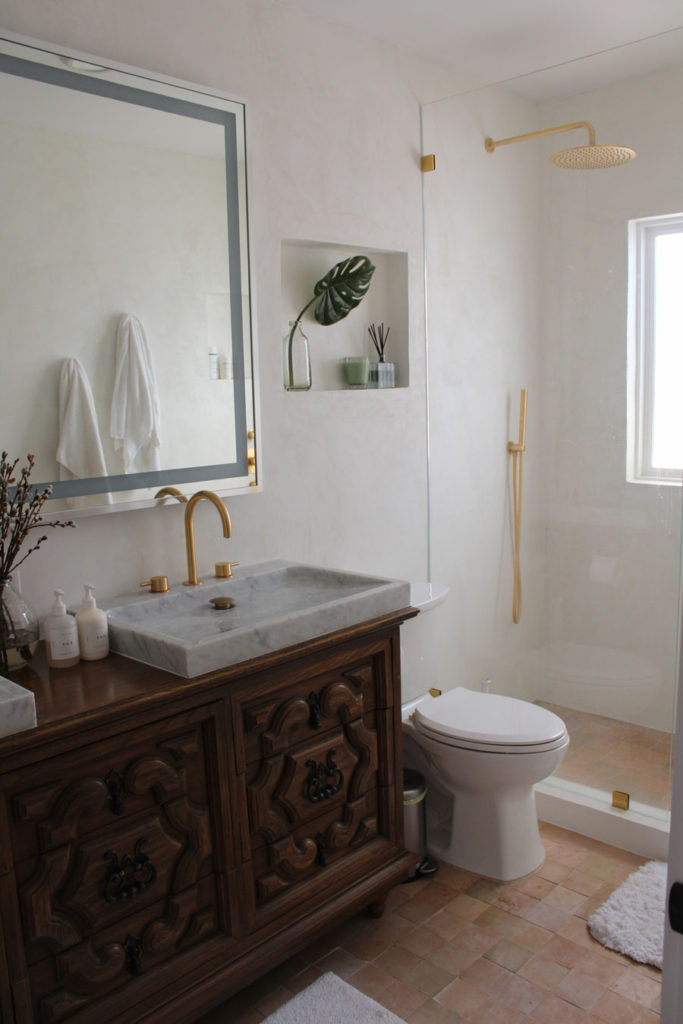
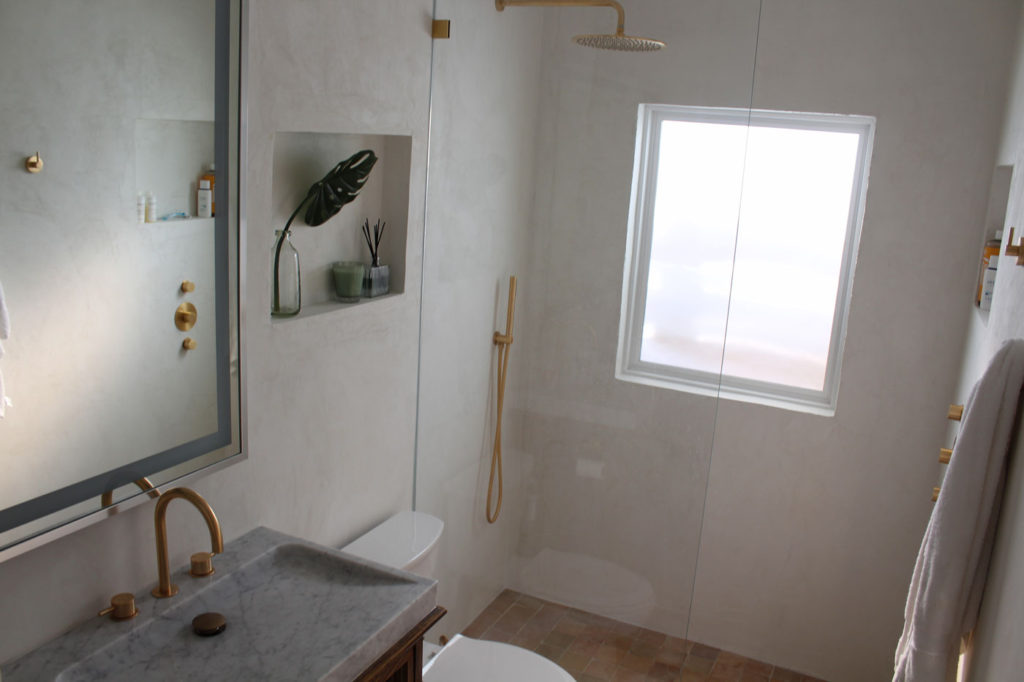
After
The Backstory
So a little backstory to this bathroom before I go into all the details. This is our first floor bathroom at House Mason. I call our house House Mason. We basically live on Watermark Brewery’s compound t this point. And this is the house Chris and I currently live in. We fully intend on renovating and AirBnbing it some day. In the mean time I get to enjoy the fun process of picking things out and following a budget (or at least try).
Anyways, this is the main floor bathroom. When we first bought the house it was attached to an extremely small bedroom. I’m talking like 12ft x 6ft. Since it was the only bathroom in the house attached to a bedroom we wanted to make it the master. Luckily there was a really small bedroom on the other side of the closet wall. So we knocked the whole thing down to double the size of the bedroom. Now the house layout is starting to make more sense.
Once the bedroom was bigger and more cozy, I then got the itch to remodel our bathroom. We were going to wait a little longer before starting this project but the shower started showing signs of mold. We knew it was time. And now I am so thankful we did this. Everything was an easy process. We used our friend and contractor at ZSF Enterprises to help with this and he was so knowledgeable and was even willing to learn new things to help me get the look I was going for.
The only tip of advice I have for doing any renovations is to make sure everything comes in and is ready for installation before you start demo. We made the mistake of doing demo and then everything started to become backordered because of COVID. So, what should have been a 2-3 month reno, turned into a 4 1/2 month renovation.
But they do say, good things come to those who wait…
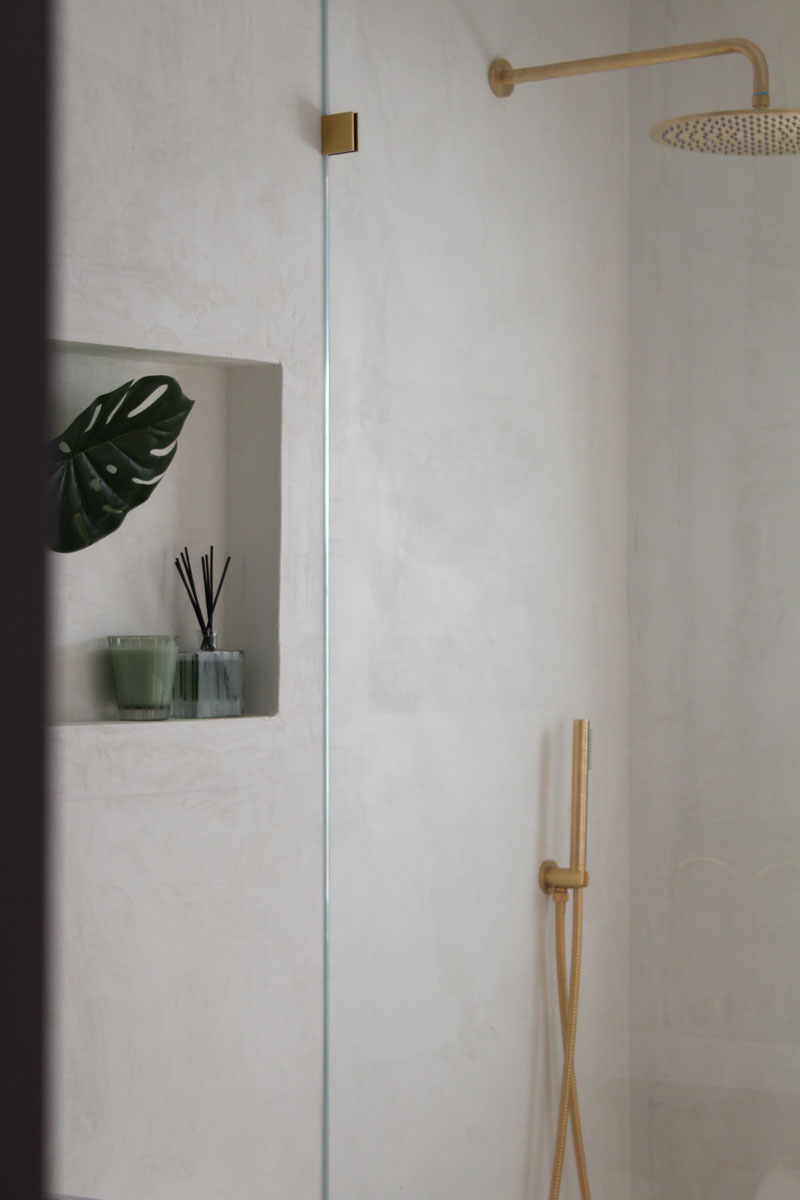
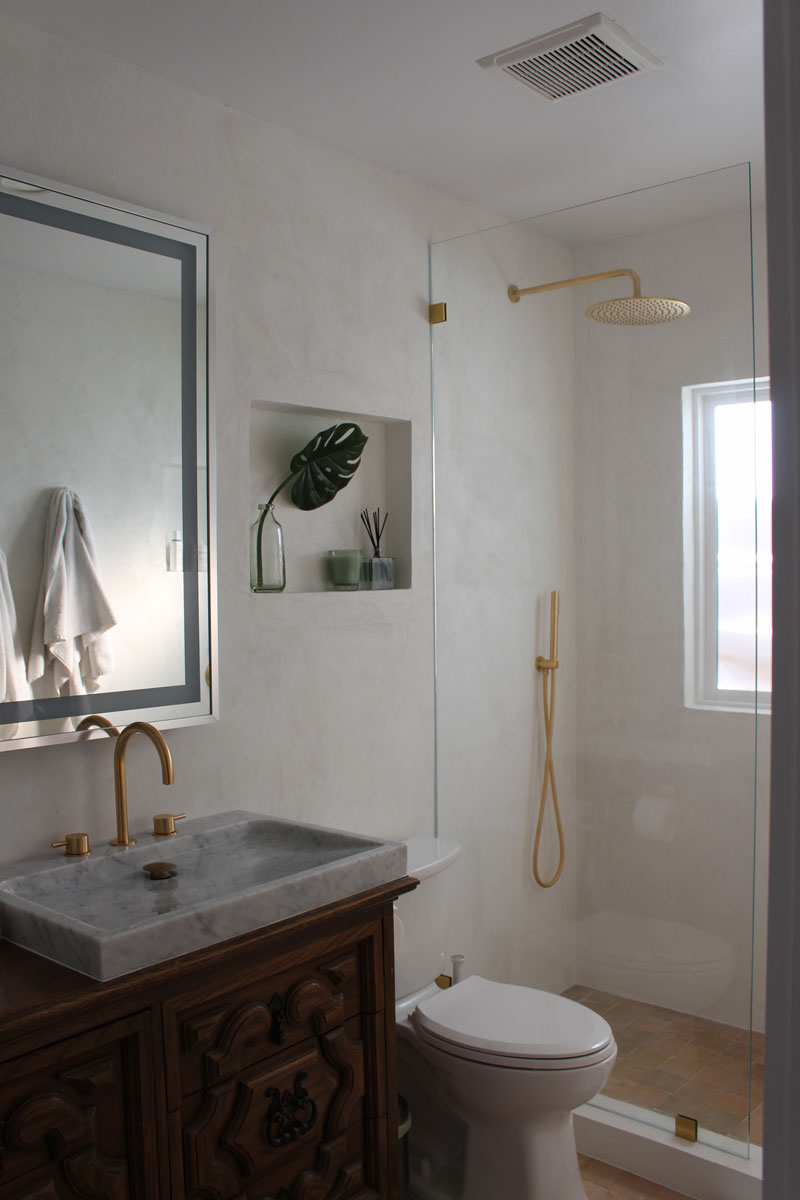
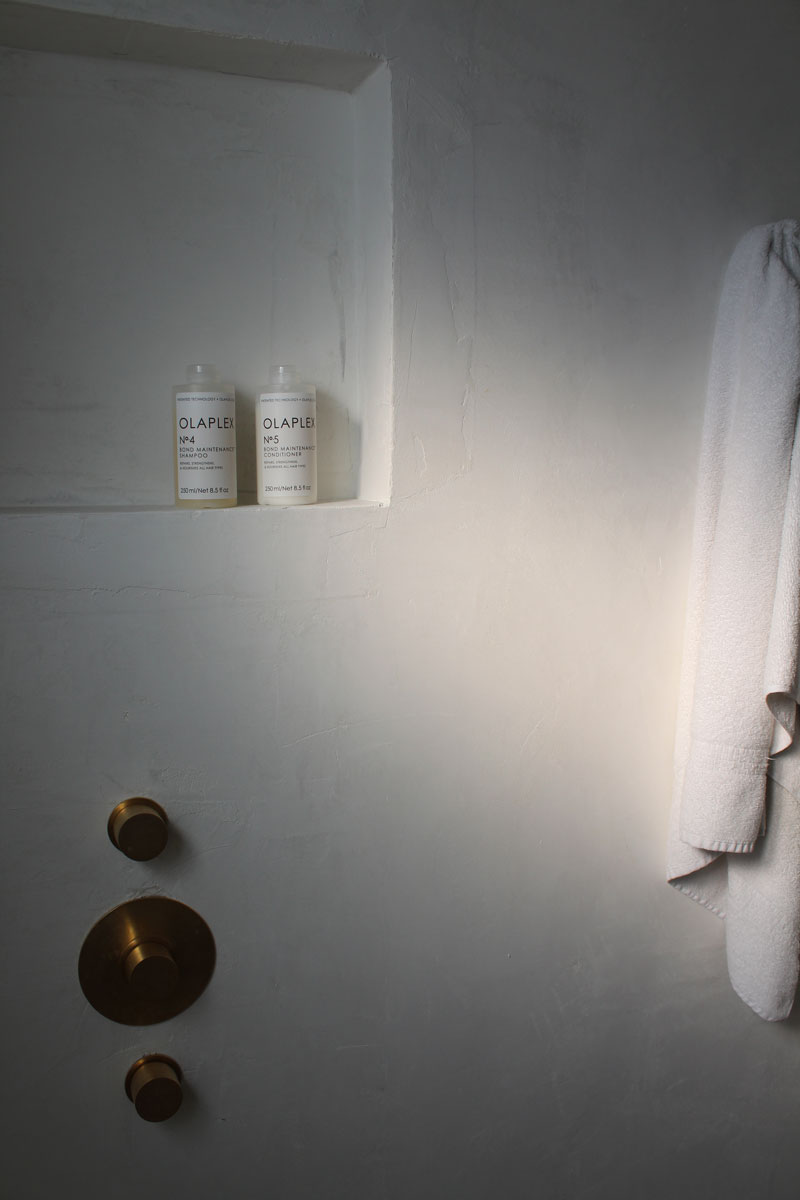
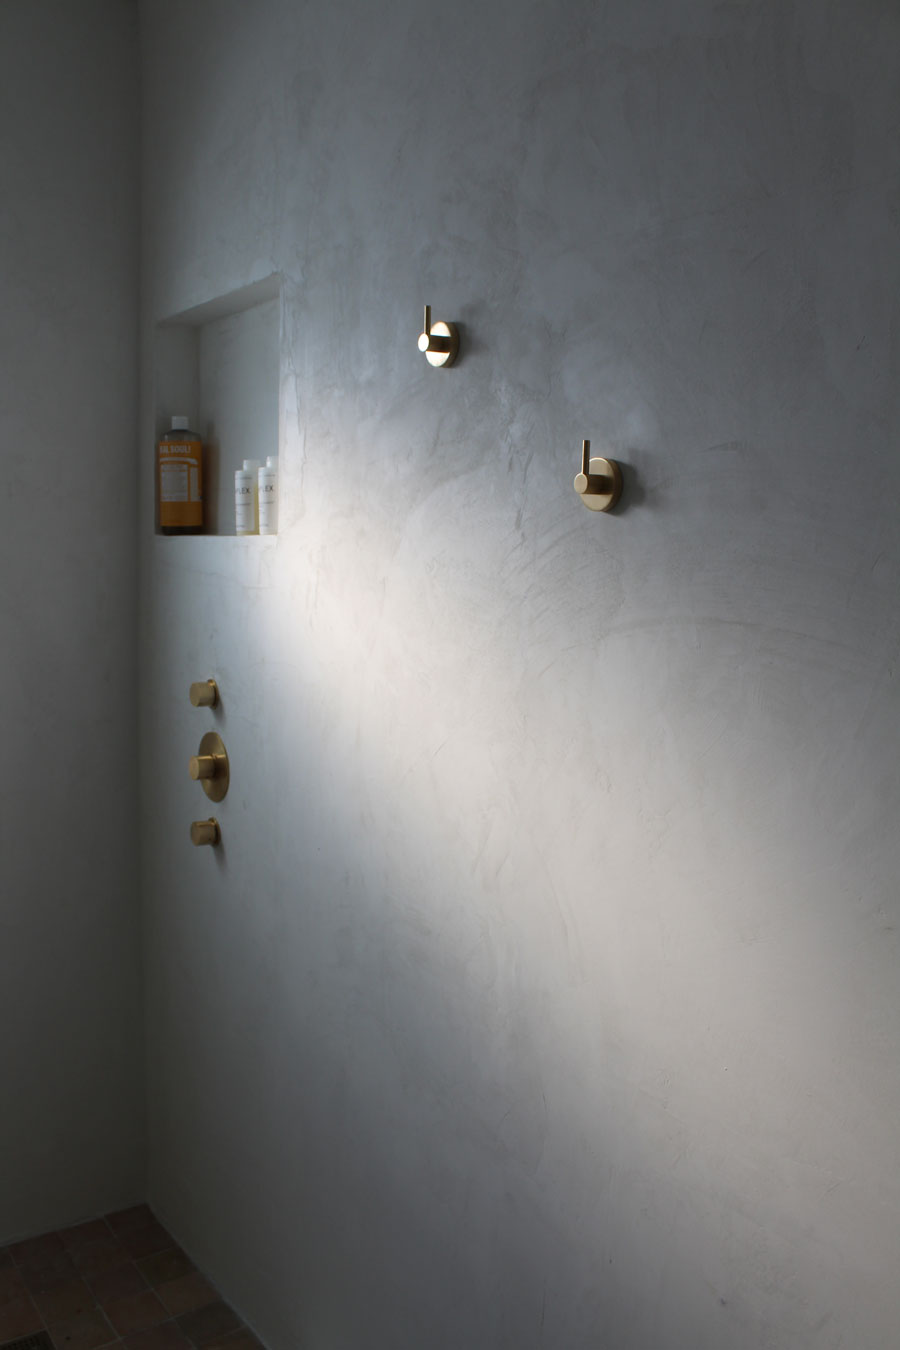
The Tadelakt Walls
When I was choosing details from this bathroom, I knew I wanted this house to have girly vibes. You see, we have two houses attached to our property both of which are next to the entrance to Watermark Solarium, our new wedding/event space. Since we have two places that we intend on being Airbnb’s for events some day, I figured it would be cool to have them be his and hers vibes with the décor. Ours is already more feminine with the coloring so I decided to go full steam ahead. And I am not talking pink on everything but just fresh whites, nudes and gold accents. A place where a bride would want to get ready on her wedding day and take photos with her bridesmaids.
I will be documenting the process of updating both of these properties but since we are sticking to a strict budget, it will be a slow and steady process, so stay tuned.
Moving along. I really love a fresh natural vibe of houses. I have a really hard time with tile and was already nervous about having to choose a tile I did not like for the walls just so we didn’t spend a fortune. But then I came across this site called Color Atelier a company based in San Francisco selling great quality Tadelakt that wont cost you an arm and a leg. You see I had considered using Tadelakt early in the process of this project but then shortly vetoed it out when I saw the prices of shipping it to the United States from places its more commonly used like Spain and Italy.
So with that said, you are probably wondering…What is Tadelakt?
What is Tadelakt?
Tadelakt is a super waterproof and durable Bathroom trend that you didn’t know you loved. Tadelakt is a waterproof surface plaster that is typically used in Moroccan architecture. To make baths, sinks, water vessels, interior and exterior walls, ceilings, roofs and even floors in some places. The word derives from Arabic for the meaning “to rub”. Which makes sense if you know how this stuff is installed. You might have been seeing this a bit on pinterest or any other trendy home design sites, but it is a technique that has actually been around for centuries in Morocco, Spain, Italy and Greece. This stuff is completely waterproof, water-repellent ( I actually watch beads of water drip down the walls as if it were tile and not plaster) and mold/mildew-resistant. This makes it super ideal for bathrooms and kitchens. I now am daydreaming about covering my entire house in it.
And, if you are like me and not the biggest fan of tile and baseboards, you are in for a treat!
How to install Tadelakt
So there are many techniques and honestly they aren’t the most simple ones either. So, with that said, I would not try to tackle this on your own without a contractor. In fact, you may want to seek a contractor that has worked with this or plastered walls before just to be safe. For me, it took 3 coats of Tadelakt. Which comes like a concrete powder that you mix with water and smear on fiberglass mesh that is applied to your walls. Then you seal up the walls and make them waterproof with a matte sealer.
Finally, you finish them off with some clear wax to really make the walls waterproof. The wax is what really made the water stream down the walls like you would see with tile. There is a chemical reaction between the limestone plaster, the matte sealer and the wax that you can read about on many other sites, however I wont get too into the nitty gritty. All I know is that it works and I am a huge fan.
So shoutout to Color Atelier for their amazing product and making it so easy to use!

Finally, what is the cost of Tadelakt?
So, this is the hard part. I have found so many prices across the internet it is tough to say. However, google and Arch Digest puts it at around $8-$15 a square foot. For me, I originally contacted a company in Spain. That was willing to ship some authentic Tadelakt here for around $2,000 to do our entire 300sq. ft. bathroom. To me, that was way high and I was out. I then struggled big time with finding a tile for the walls that didn’t have obvious grout lines (my arch nemesis). I found that all the tiles I liked anyways would be around $2,000 anyways. But I still was nervous about buying something from Spain. What if I wanted more in the future. What if the stuff didn’t work out?
Then when I found Color Atelier I was so excited. They have great testimonials. They are a small business that I could support during the pandemic and to top it all off, the cost of the walls and shower was about $900 total. It was a miracle. So, I pulled the trigger, purchased the Tadelakt. Then got to convincing our contractor Zack to learn how to install this stuff. Which, I should definitely mention here, Color Atelier is also such an amazing company. Every time Zack or I had a question about installation, we were able to call them up and have them walk us through everything. This is very rare these days with businesses and we couldn’t appreciate them more!
Long story short, I’m obsessed. And the way it came together with everything else, well, now I am ready to do more remodeling…
The Rest of the Bathroom
So I do think here is where I should apologize for the quality of these photos. I am new to photography and just learning for fun in my leisure time for this blog. I did add as many as I could that came out with great lighting but man this photography stuff is hard. Finding the right angles and lighting is a talent.
Anyways, moving along to the rest of the bathroom. I think it would be a sad day if I completely forgot to mention one of the stars of this bathroom which is the tile…

As I mentioned before, I am not the biggest fan of tile. I hate the way grout lines look. I love a natural finish to all things interior so I knew this would be a tough task to find something I like.
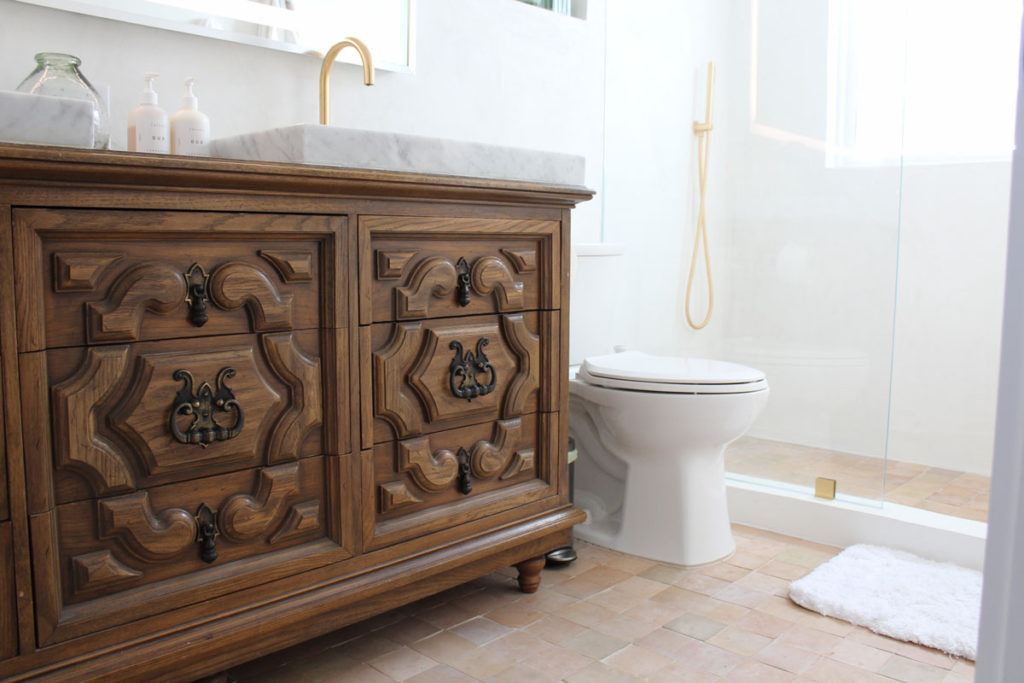
For a while I’ve seen Cle Tile in bathrooms all over and even some kitchens. Its a clay Moroccan Zellige tile that that all come in different shapes and sizes. That way when you lay them down with no gaps it makes a beautifully imperfect flooring that I am absolutely happy with.
For a little background, Zellige tiles are terracotta clay tiles that have been made the same way for centuries. Zellige tile are handcrafted tile that use non-refined clay from Fez Morocco. Basically, that is just a fancy way to say that these are perfectly imperfect, durable tiles that will last forever but get better only with time. Plus, did I already mention no huge grout lines? Yeah, absolutely stunning.
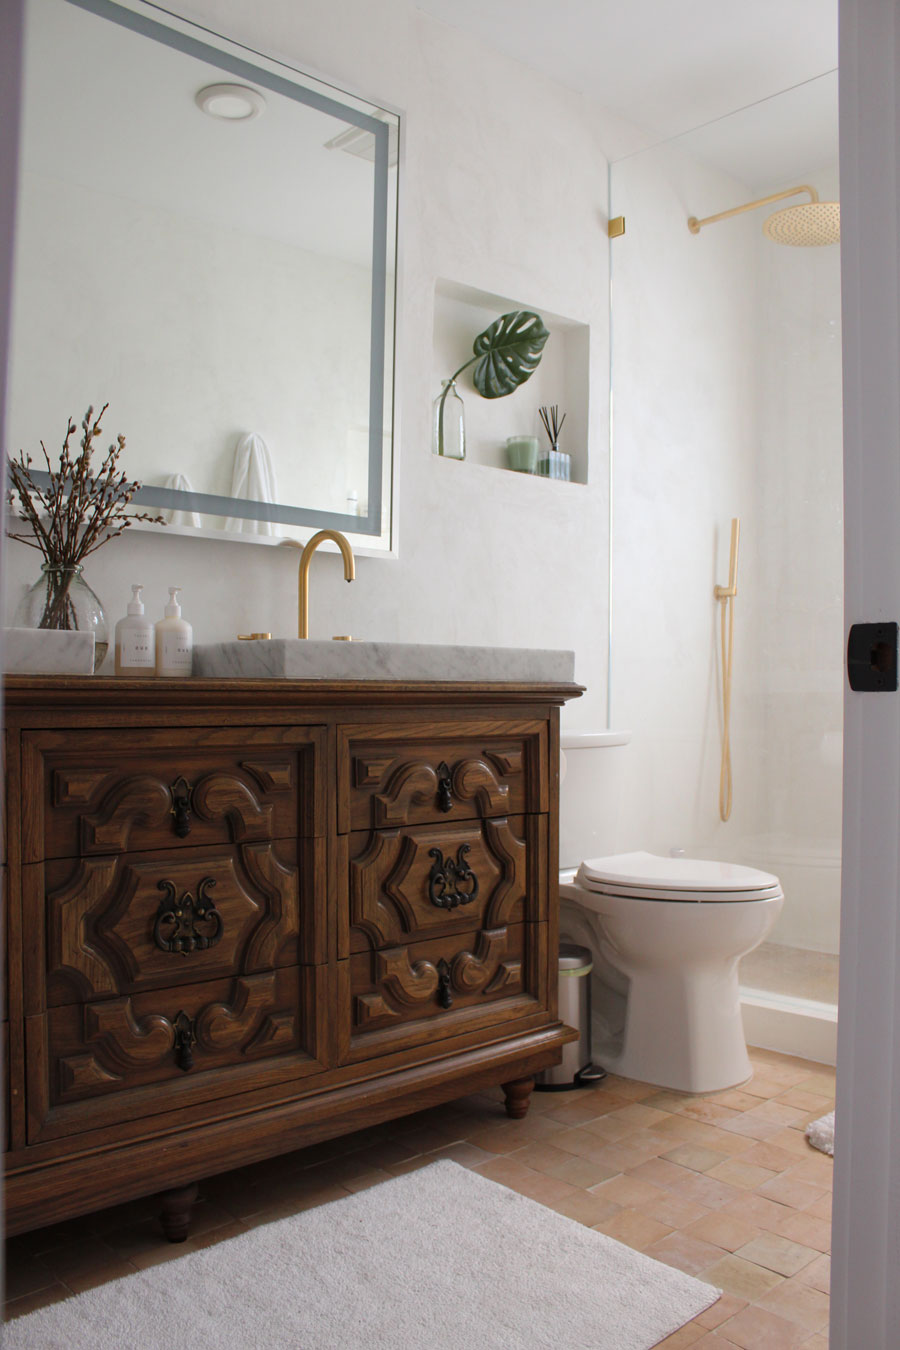
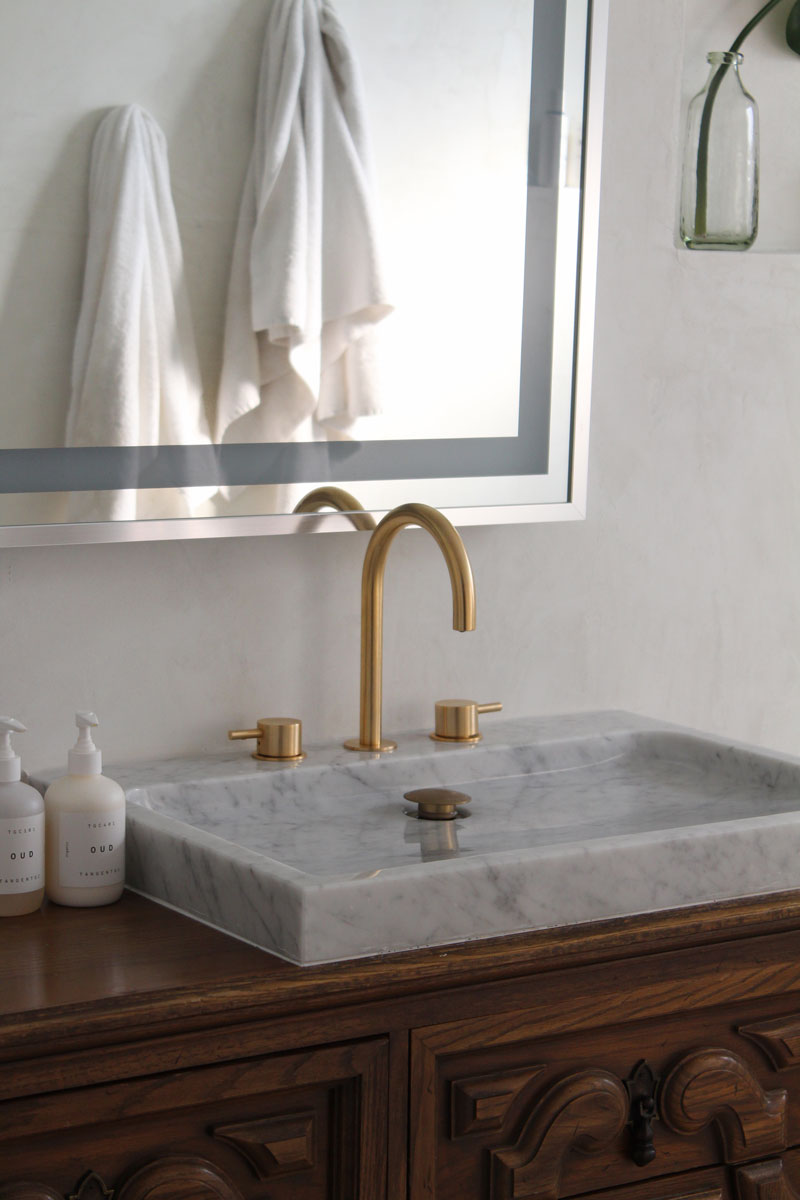
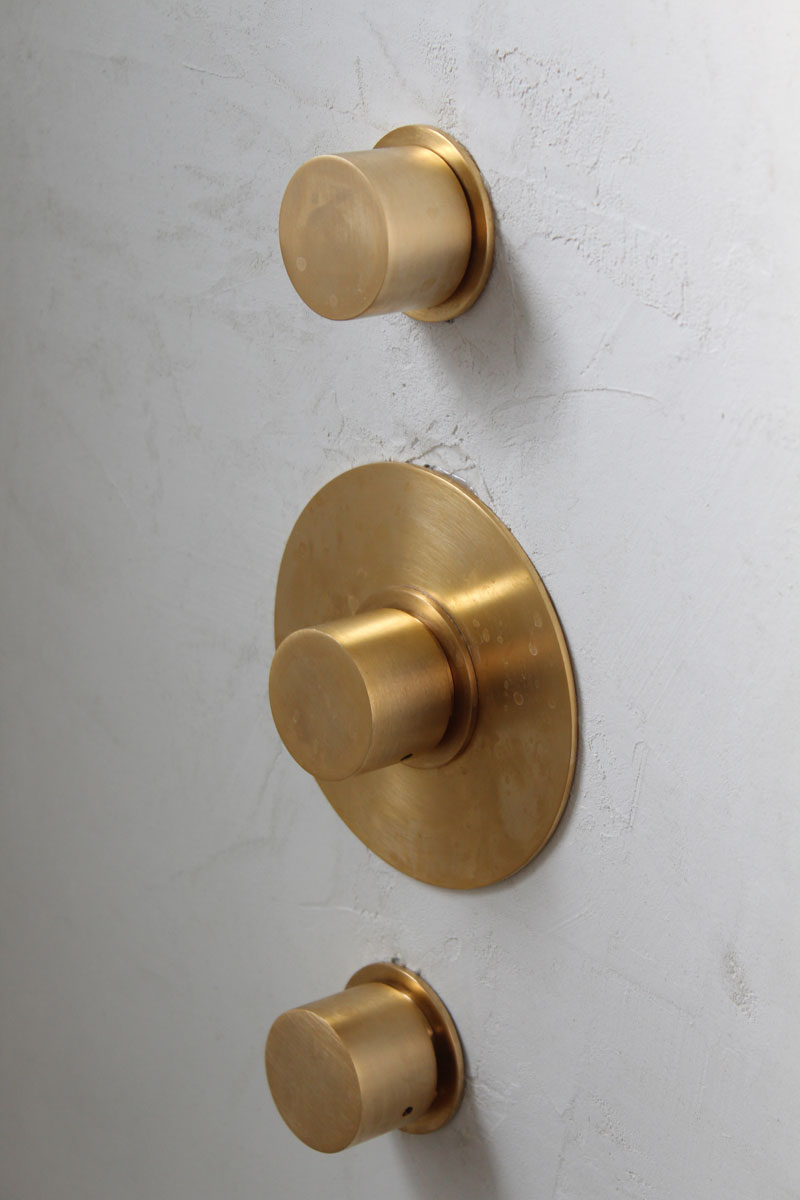
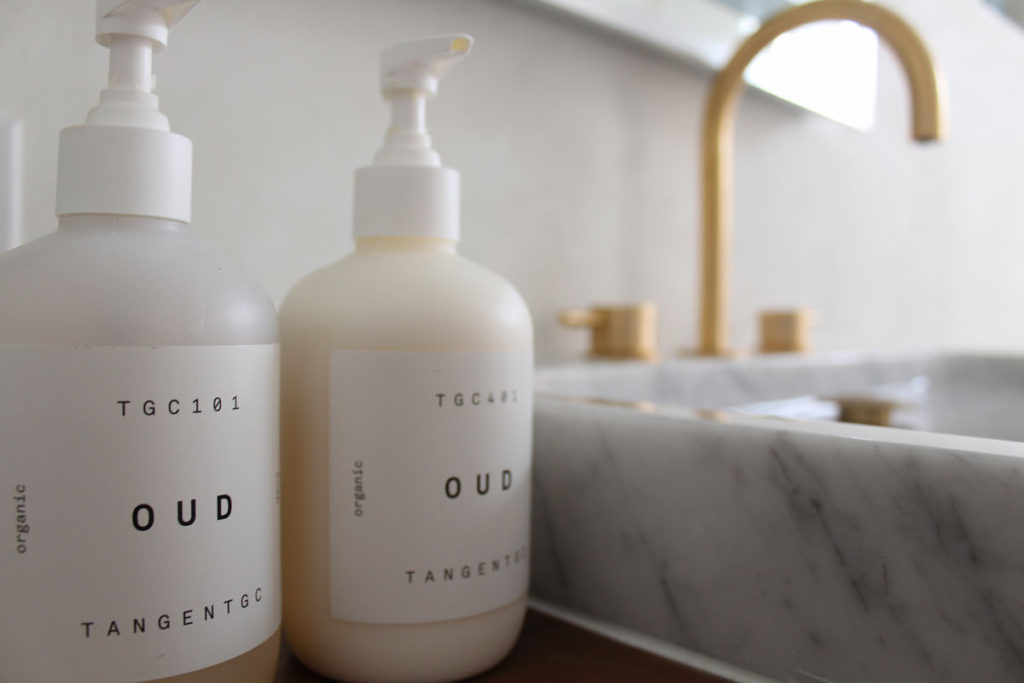
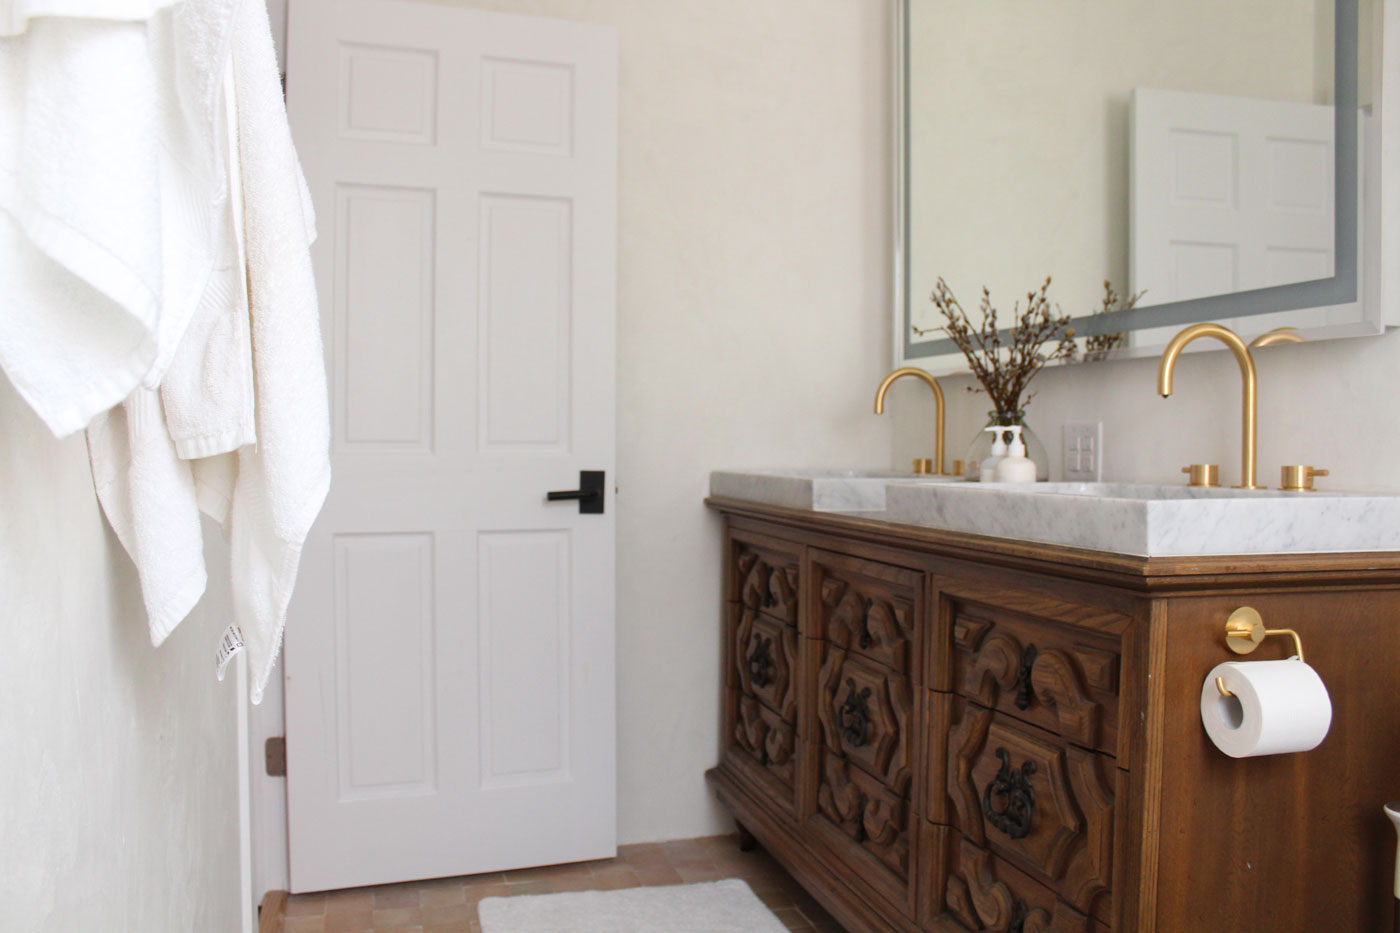
To really send this project over the edge for me. I knew I wanted to get gold fixtures for the vanity as well as for the shower. I had a really tough time finding a gold color that I actually liked. That would be soft gold and not pink, or yellow. That may seem like an easy task as there is so much gold out there today, however, I am picky so it was not.
Step in Studio 41 Chicago. I contacted someone on their team when I was ready to throw in the towel and no longer wanted to search the internet for bathroom faucets anymore. Plus I had no idea what pieces I needed, all I knew is I had a pinterest board of ideas and no idea where to search. They were instantly able to look at a photo of a bathroom shower head that I liked and send me option of what they had. It was perfect.
So of course, wanting this to feel like a spa, I opted for a 12 in shower head and a handheld shower. So that at all times, you can have both on and be warm and feel like you are in a rainforest. Plus, being someone with a lot of hair, I knew the handheld would be perfect for rinsing out shampoo and conditioner quickly. Us women, we always think of everything.
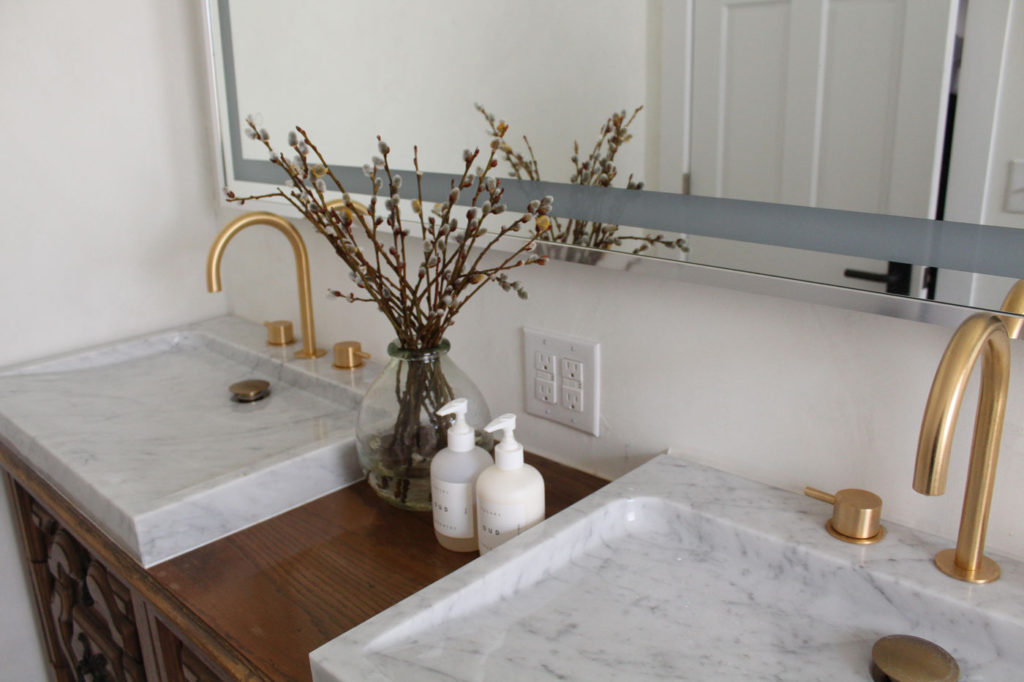
Finally, I decided to go with matching sink faucets that were high enough to not only wash your hands but have enough room to wash your face without splashing water all over the vanity countertop.
And speaking of the vanity…
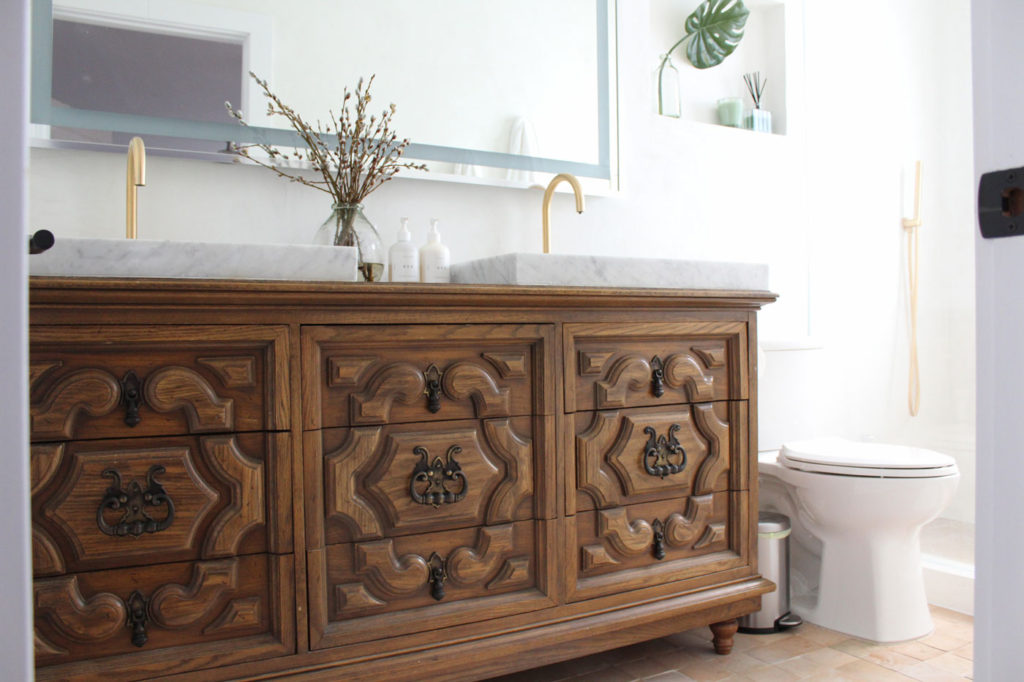
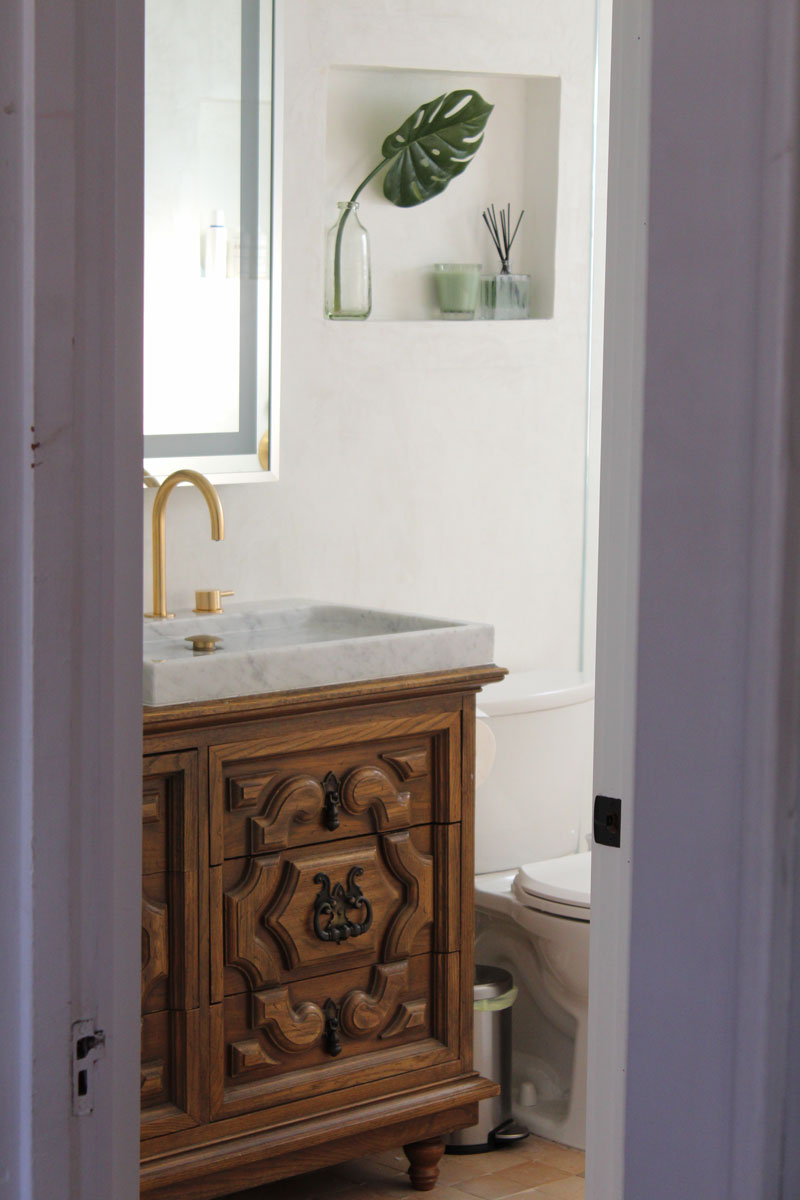
The Double Sink Bathroom Vanity
This guy is custom. I say that with a hugggggeeeee disclaimer, that custom does not always mean expensive. In fact, we went custom to save money.
By the end of the budgeting and picking out of things we came to one conclusion. I have a knack for always picking out the most expensive stuff. With our budget running out quick and still needing to get a vanity, the search was on. I don’t know about you, but if you ever google bathroom vanities before you will quickly realize that they get expensive pretty quick. I’m talking thousands. With that, I was not able to find anything that I liked without it being completely out of our price range or worse, the size we needed. I knew to keep the Moroccan vibes going, I was hoping to find a vintage inspired one with a marble top that wouldn’t cost $5,000, but that is like winning the lottery. Absolutely impossible.
However, I was sitting in my living room one day staring at our thrift store credenza. One we found at a place called Hoity Toity in Michigan City. It dawned on me that it might be the perfect size. I found our closest tape measurer and started measuring. The size was a perfect match. Did I mention we found this piece of furniture for only $250.00. Yeah. Perfect…
Anyways, I spent the next week ordering marble vessel sinks from Living Roc out of Texas, and unfinished furniture legs to paint and screw to the bottom. The sink turned out perfect and all in the whole thing only cost us $1,000. It is worth every penny. It might even be my favorite piece of furniture in our entire house.
So, I hope I was able to cover all the odds and ends of what it took to make this bathroom transformation. If you have any questions or need any help with your next project, feel free to reach out or contact me.